How To Put Peel & Stick Wallpaper on Textured Walls
Time to read 5 min

Time to read 5 min
Are you looking to revamp your living space but dread the thought of tackling heavily textured walls and ceilings? In this comprehensive guide, we'll show you how to apply peel-and-stick wallpaper to lightly textured surfaces and provide tips on dealing with heavier textures. Additionally, we'll discuss the importance of using a wallpaper primer for a seamless and long-lasting application.
Before deciding to apply peel & stick wallpaper to your textured walls or ceilings, it's essential to make sure they are actually compatible.
Huggleberry Hill's peel-and-stick wallpaper works perfectly for smooth surfaces, but its luxurious thick texture and excellent adhesion means it can also adhere to very lightly textured surfaces.
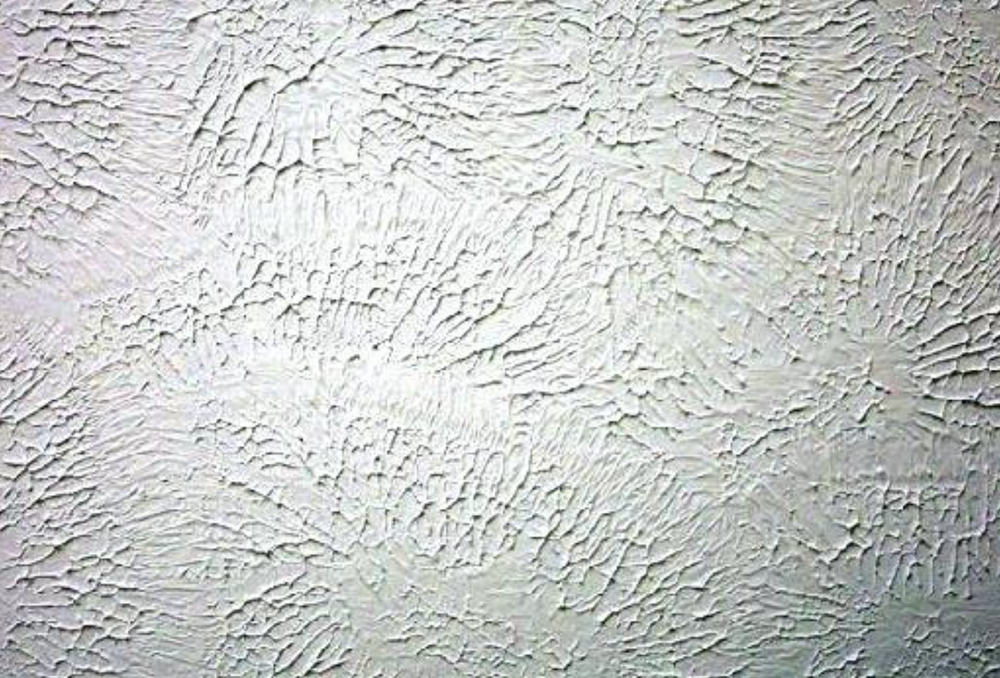
However, if your walls or ceilings have a heavier texture, such as Popcorn or Skip Trowel, you'll need to make some preparations to ensure a smooth application.
The easiest way to test whether your surface requires smoothing before installation is to purchase and apply peel-and-stick wallpaper samples. Once applied, the finish should be smooth and bump-free with none of the surface texture showing through.
If you’re unsure whether you can apply Peel & Stick wallpaper to your ceilings or walls, getting wallpaper samples from your desired wallpaper brand and patch-testing your application is the best way to go about it.
We say “from your desired wallpaper brand” because there are many factors that go into how wallpaper will look on a textured wall: from the quality of the design itself, to the thickness of the wallpaper panels, the adhesive used, and the texture of the wallpaper – where mattes and textured wallpaper will mask bumps and imperfections better than smooth, glossy wallpaper. Different brands will have different wallpaper depending on these factors, despite the fact that they’re all categorized as ‘peel & stick wallpaper’.
Huggleberry Hill’s OEKO-TEX Certified self-adhesive textile wallpapers are up for the challenge. Our 19" square samples aren't just a sneak peek; they're an invitation to get creative. Experience the luxury of peel-and-stick ease and fabric-like texture. Your walls, your canvas!
If your surfaces have heavier textures, here's a step-by-step guide to preparing them for peel-and-stick wallpaper. You may wish to consult with an expert to ensure a perfect finish.
Assess the Texture: First, determine the severity of the texture. You can do this by running your hand across the textured surface. If it feels rough, bumpy, and uneven, it's likely a heavy texture that needs to be smoothed. Textured surfaces such as Popcorn and Skip Trowel are typically too heavy and require smoothing before wallpaper installation.
Repeat if necessary: Depending on the severity of the texture, you may need to repeat the process until you achieve the desired smoothness.
"We strongly recommend using a wallpaper primer before installation of our peel-and-stick wallpapers.”
Now, let's emphasize the significance of using a wallpaper primer when applying peel & stick wallpaper to textured surfaces. A wallpaper primer is an often-overlooked but essential element in achieving a seamless and long-lasting application of peel-and-stick wallpaper, especially on textured surfaces.
Here's why it matters:
1. Surface Protection: A quality wallpaper primer creates a protective barrier between the wallpaper adhesive and the underlying surface. This is crucial for preventing any potential damage to the drywall or painted surface when you decide to remove the wallpaper in the future.
2. Adhesive Bond: Primers improve the adhesion of the peel-and-stick wallpaper, ensuring it adheres firmly and securely to the surface, preventing peeling or bubbling over time.
3. Easier Installation: Wallpaper primers can make the installation process smoother and more forgiving, allowing you to reposition the wallpaper if needed and minimizing the risk of misalignment.
4. Smooth Surface: In the case of lightly textured surfaces, a primer can help even out irregularities, providing a consistent and smoother base for your wallpaper. This is particularly valuable when dealing with lightly textured walls or ceilings.
Applying a wallpaper primer is a straightforward process. Here's how to do it:
To ensure your wallpaper application is flawless, consider the following tips:
1. Plan Your Layout: Before applying any wallpaper, plan the layout. Measure your wall or ceiling carefully, accounting for doors, windows, and outlets. This will help you determine how to align the wallpaper panels.
2. Trim Carefully: When trimming excess wallpaper at the top and bottom, use a sharp utility knife or wallpaper trimmer. A clean cut will result in a neater appearance.
3. Remove Bubbles and Wrinkles: As you apply each panel, use your smoothing tool or squeegee to remove any air bubbles or wrinkles. Start from the center and work your way out towards the edges.
5. Be Patient: Take your time during the application process to ensure a perfect final result.